How does audio compressor work? What exactly it is?
Compression of audio tracks
Audio compressor is maybe the least understood of all
processors commonly used in multimedia production, whether
it is studio, radio or television industry. But they are
indispensable in obtaining truly professional sound. Without
them the sound would be much more dull and lifeless.
The audio compressor is a device used to
intervene in the spread of dynamic range of a recording.
It's name suggests compression and so it is. It is like the
equivalent of an automatic sound engineer, who quickly turns
down the level of
the recording, when it begins to fall in the red area on the
meters and
turns it up, when very quiet sounds are poorly audible. The
audio compressor
works on a similar basis as it used to be with manual riding
the level of the recording on
analog tape machines. The only difference is that the audio
compressor reacts much more quickly than
the person who governs the knob or slider level and it acts
fully automatically. The task of
the audio compressor is not only protection against overdriving
the sound,
which causes distortion in the signal. Compressors generally improve
the sound of a recorded track. They make it sound more
compact, powerful, warm and round. In today's highly dynamic
digital recordings audio compressors have even greater
significance for the shaping of sound, than ever.
A typical compressor has 5-knob
regulators:
1 Threshold
2 Ratio
3 Attack
4 Release
5 Gain Make-Up
The audio compression is widely applied, because
it affects
the positive aspects of sound recordings and the improvement
takes place mainly because the quiet and
hidden sounds are raised up to the general level, which makes the
recording sounding more full and wide. This is nicer for the ear.
Some of the compressors have additional knobs for adjusting
the input and
output level. But not all the audio compressors have these regulators-early
audio
compressors were only equipped with the gain knob, and the whole process took
place almost automatically by raising the level of the input.
At a time when the recording gear used only reel-to reel
tape some
compression of audio happened automatically just by the
nature of this technology and this sounded really nice for
the ear. Also the studio equipment like the mixing consoles,
effect processors or various preamps had far less dynamic
range of sound than the modern gear. Today, in an age of
digital audio, compression is more desirable than ever.
Sterile digital signal with a very large differences in
dynamic range and containing a lot of transients, (violent
peaks and jumps of the sound waves), after proper compression is gaining
much smoother character, which is nicer to listen to and
accommodate by the human ear.
In the short characteristics of the
audio
compressor below we will not only learn about the rules for its operation,
but also we will gain potential for certain tricks of advanced
audio compressor, that can give us a very interesting sound.
Principles of adjusting and operation of the
audio compressor
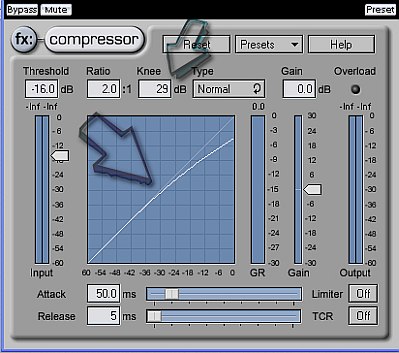
Let's use
here an example of good software compressor which has nice
and clean "interface", a part of Ultrafunk plug-in
bundle. The two most important
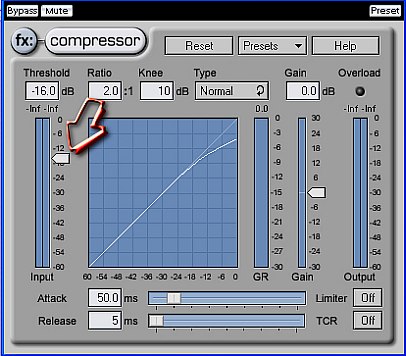
adjusting elements in the compressor are the Threshold
and Ratio. Threshold determines the level of the signal from
which the compressor starts to operate, for example -16 db.
The following image shows an arrow
pointing the threshold slider set to -16
db.
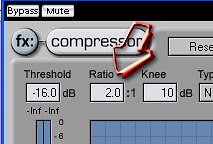
The box "RATIO" shows the
value of "2.0:1." Let's
look at the following picture:
This means in practice that at this
setting the compressor will reduce the dynamics over
-16 db about 2 times. The lower level signals, staying below-16 db
remain intact, but over the - 16 db threshold every decibel will be reduced by half. So, for example,
if the threshold would be set at -8 db, at this 2:1
Ratio the dynamics there theoretically will be compressed by 4
db. However, this
is only theory, because depending on the time of the "attack"
parameter, the compressor can pass even big quantities of
sound impulses, which raise the theoretical reductions at
least by half.
So if the original signal was coming up to zero db, when
you turn on the compressor set to -16 db threshold and 2:1
ratio the signal will be passing -8 db, and hitting around -4 to -5 dB below zero.
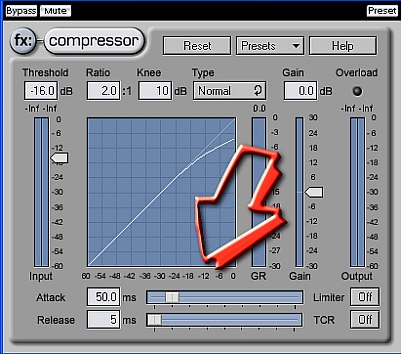
The ratio is the amount of reduction which the audio compressor
applies to the dynamics of the signal. For example, if you
set the Threshold at -16db, and Ratio at 2:1 it means that if only the
signal exceeds minus 16 db compressor will take action and
will cut every decibel of dynamics about that level by half,
for example if the signal raises by 8 db above the -16
db Threshold, it will be reduced to only about 4 db above
that threshold. Because the overall signal limited this way becomes
quieter,
the overall level of sound after the compressor action can be raised by the regulator "Gain Make Up". It
brings the level of the signal back to the state prior to
compression. But then the sound becomes more saturated,
dense and squashed, sounding punchy and making stronger impression. Other
two sliders - Attack and Release are used to set the time
of reaction for the compressor and the time to return the entire
compressor system back to the neutral state:
Generally quick setting of "Attack" within
1-5 milliseconds makes very little transients passing
through, which peak when
there is a lot of fast high frequency waves present in the
audio signal. When the high-speed signals enter the compressor
which reacts quickly and stops them the sound becomes
more compact, focused, with less content of high frequencies,
these so-called transients. Attack set for longer times of
for example 50 ms will cause the compressor to pass those
transients (particularly present in high tones), such as
drum cymbals or the trumpet, so that the sound will become less dense,
brighter, more spacious. If the compressor is more
transparent in operation, it does not react too quickly. The "release"
determines how long the compressor is coming back to neutral
state after the
sound was compressed. Carefully use the longer times of the
release parameter, because it
may cause the effect of pumping compressor, which is rather
negatively perceived feature of the sound. It is safer to use a
shorter time of release, but too short time of release may
in turn cause a distortion of sound sometimes. Generally,
the release time should be set between 1 and 15
milliseconds. In some cases, producers deliberately and knowingly
use the effect of pumping, which can be an intentional artistic effect.
But
always the proper setting of an audio compressor depends on the
sound of the
recording and there can be no universal setting that sound
good for all.
Personally, I recommend the use of a fairly long time of
attack, short time of release (which can be extended if
the music has slow rhythm) and low-value "ratio",
typically between
1.6:1 to 4:1. Then we will be able to find a very full, natural
sound without transformation of it's dynamic structure. In mastering
we generally use very little
"ratio" value between 1.4:1 and 2.0:1.
What should be the order of setting the knobs or sliders on
a compressor?
There are no rigid rules, but perhaps the
following example would help here:
Let's say that we have a drum set in the multi-track project and
we want it to glue better with the rest of the tracks, and at the
same time was well distinguishable in the mix. We have two
options here: one if we want to get the
dramatic compression and hear the effect, another one
we want if more
delicate and natural sound. In the second case, we set
the "ratio" at about 3.0:1, in the first at at least 6.0:1.
Of course, it should be remembered that as long as "Threshold"
will be set to 0 dB we will not hear any effect. Compressor always
operates from a set threshold below 0 decibels, which is
below the maximum possible volume. So when you play back the
track slowly turn down the "Threshold height". As soon
as you turn it down below the highest peaks in the recording
you will have compressor starting to take action. Therefore, there are
absolutely no rules, what is the best universal setting of
the
"Threshold". Everything depends on the level of the
track at
which it was recorded, some recordings have peaks at -0.5 db,
some at - 8 db an some at -26 dB! And there are those that have
peaks at -32 db. Therefore it is important to note that the "Threshold"
must always be set slightly below the peaks on the recording, then
the compressor starts working. If you set it deeply below the
peaks, you be able to get quite a dramatic effect. If you
set it
only a few decibels below the peaks, you get very slight
difference in sound but maybe cutting just tops of the
signal make the sound more natural. When the "Threshold"
is deep below the
peaks we have to deal with a big reduction in the track volume, which should be compensated
by "GAIN MAKE-UP". When the "Threshold is only a decibel or
two below the peaks in the signal, the reduction in gain is
very slight, and thus compensation with "Gain
Make-up" will not be needed.
So the
drums in this example will sound natural and smooth if we
just cut the peaking portion of the signal or will become
big and punchy if we get much deeper with the threshold.
Remember, too deep sounds bad.
Values of the "ratio" and "threshold" should be
set the first of all audio compressor settings. These are the elements
that have the most influence on
the sound.
Most compressors have the "GAIN REDUCTION" meter, which
shows, how many decibels of the overall level the compressor
has reduced. In typical applications of the audio compressor,
this value should not exceed 5 db, unless our objective is to
get a dramatic effect on sound. In the case of a reduction of 5 db it is necessary to
turn up the signal
using the "GAIN MAKE-UP" by the equal or slightly
smaller value of
about 3-5 dB. Then you will able to get a perfect, powerful and
clear sound, which will be perceived as natural and pure.
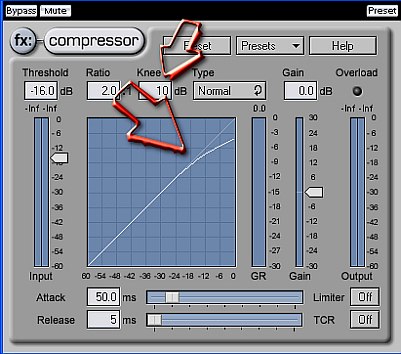
We still need to clarify on one element: the "KNEE".
On the picture below we can see that the point of threshold
is gently rounded, and
"KNEE" value is 10. It is clear that the compressor starts to "catch"
from -16 db but in a fairly benign way, and about -13
db its operation is fully established:
However, let's try to change the value
of the "KNEE"
and see what happens then:
When the "KNEE"
is at
0 we have a very sharp transition to a compressor actuation
just above -16 db, and steady, constant level of compression
to the end. In practice, this means that compression will
give us more focused sound. You can also obtain the
extreme opposite effect, "KNEE" set an extremely soft, so
soft that tripping compressor is well below a certain
"Threshold"!. Here's an example:
Such a "KNEE" of a compressor is called
the "soft KNEE" - The
"Soft Knee", giving mild compression is suitable
particularly for vocals or string instruments. In contrast
is the sharp shift actuation of "HARD KNEE", useful when
mixing such instruments as
drums or electric guitars.
Hardware equivalent of compressors used in the past have
generally one type of the "KNEE", different
brands showed a different sound, so famous studio engineers held the whole arsenal of different compressors
at hand, using
them for different purposes in accordance with their pleasure
and experience.
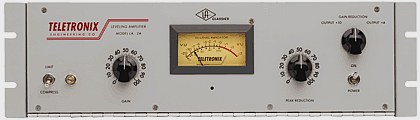
Here is a famous Teletronix LA-2A "Leveling Amplifier":
As it possess the specific
sound, it was (and still is) regarded as the first league studio
equipment. It's sound can be heard on numerous hit records.
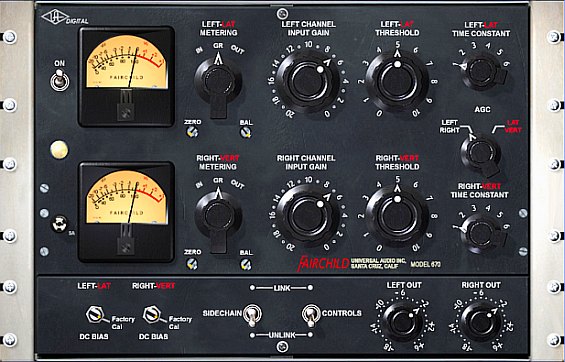
Another legend of great sound is the Fairchild 670. Compressors
of this type were used in EMI Recording Studios at Abbey Road in London
during the recording sessions of The Beatles:
Here is the famous Fairchild 670 in stereo version:
A successful program to the Fairchild is its
software equivalent, the Blue
Tubes FA-770:
There is a very great
variety of both hardware and
software compressors. It is impossible to tell which one
is best, much less to recommend the optimal settings for
any kind of sound that is passed through the device. The successful use of
the audio compressors in the mix and mastering
depends mainly on qualifications and experience of
the technician that operates these devices. Without the
human element the equipment remains only the dead
matter.
For all your questions and
inquires please contact us at:
All articles are covered by
International Copyright Laws.
Copyright ® by Mariusz Wojtoń, 2007-2008. Copying,
the use of excerpts for any purpose without the
agreement of the author prohibited.
Emotion Converting Plant is a registered trademark
of Mariusz Wojtoń.